Why a simple routine for cleaning your ice maker matters
Quick 5‑step checklist (for most home ice makers — always confirm in your owner’s manual):
- Turn the machine off, unplug it and drain the reservoir or internal tank.
- Remove the bin, scoop and loose parts; wash with mild dish soap and warm water.
- Fill the reservoir with a manufacturer‑approved cleaner or a diluted vinegar solution only if your manual allows it.
- Run a cleaning or ice cycle, then flush with at least two batches of fresh water ice and discard those cubes.
- Wipe the bin, chute, scoop holder, sensor and exterior vents, then reinstall all dry parts.
Safety and warranty note: Always read your model‑specific instructions before using vinegar, commercial descalers or a dishwasher. Some brands, including certain Scotsman and Manitowoc residential units, explicitly prohibit acidic cleaners such as vinegar and warn that high dishwasher heat can warp plastic bins or void coverage on accessories.
Knowing how to clean an ice maker properly protects both taste and health. When a machine runs for weeks without careful cleaning, warm air, standing water and food spills create perfect conditions for mold, mineral scale and biofilm inside the bin and water path. A short, repeatable routine will keep ice clear, prevent low ice output and extend the life of the maker.
In testing dozens of home ice machines, I see the same pattern with families who entertain often and use a stainless steel unit on the counter. The machine will look clean outside, but the ice bin, the harvest area and the condenser fins are coated with dust, water scale and sometimes a thin biofilm that dulls the ice cubes. Once we remove that buildup with the right cleaner and a structured cycle, the machine will return to full production and the ice cubes look like fresh water frozen in glass.
Think of your ice maker as a small appliance that handles food, not just water. Every surface that touches ice, from the bin walls to the scoop storage and the chute, needs regular cleaning to keep ice safe and to keep ice tasting neutral in drinks. A consistent schedule will keep the machine running well, will keep ice output stable and will keep your family from quietly avoiding cloudy cubes.
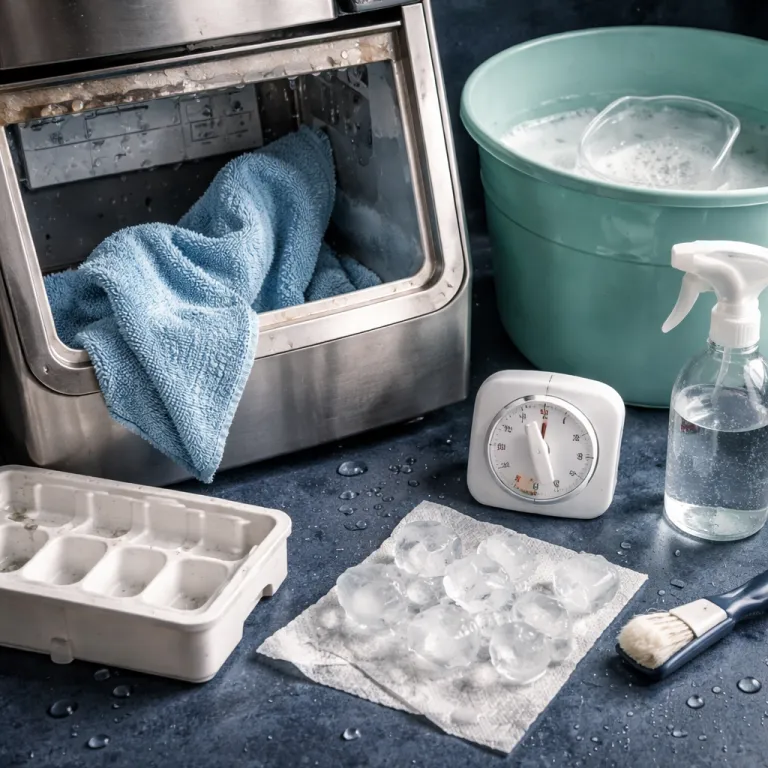
The 15 minute routine: how to clean an ice maker step by step
For busy households, the most realistic way to handle how to clean an ice maker is a 15 minute routine you repeat every two to three weeks. Always start by pressing the power button to turn the machine off, unplugging it from the outlet and letting any moving parts stop completely. Place towels under the unit if it sits on a wood counter, then drain any remaining water from the reservoir or internal tank into a bowl or sink so you will not spill near electrical components.
Next, remove the ice bin, any loose ice cubes and the scoop, then wash those parts in warm fresh water with a mild dish detergent before drying them thoroughly. Avoid abrasive scrubbers that can scratch plastic, because rough surfaces collect more scale and mold. Check your owner’s manual to confirm which parts are dishwasher safe, since some manufacturers warn that high heat can warp bins or void the warranty on certain accessories.
Then mix a 10 to 1 solution of filtered water to distilled white vinegar, which is the same ratio many people already use when they clean coffee equipment, but only if your brand does not forbid acidic cleaners. Pour this solution into the reservoir of the ice maker until it reaches the usual fill line, then run a full cleaning cycle if your machine offers one or run a normal ice cycle and discard the first harvest of cubes. This gentle acid mix will keep water scale soft, will help discourage mold on plastic and stainless steel surfaces and will keep internal parts ready for the next deep cleaning, but you should switch to a manufacturer approved cleaner if your manual advises against vinegar or warns that acids may damage specific seals.
After the vinegar solution or branded descaler has circulated for at least one hour inside the machine, drain it completely and refill the reservoir with fresh water. Run two full ice cycles, throwing away each batch of ice cubes so no cleaner taste remains and so the machine will flush every line. Once the second cycle finishes and you have confirmed clean ice with no smell, reinstall the dry bin and scoop, then turn the maker back on for normal use.
During this routine, take a moment to wipe the exterior stainless steel panels and the air vents around the condenser with a soft cloth slightly dampened with cleaner, taking care not to spray liquid directly into control panels or fans. Keeping those vents free of dust and pet hair will keep air flowing well across the condenser, which helps prevent low ice production on hot days. If you own a modular or commercial style unit and need guidance on specific parts such as pumps or valves, a detailed guide on how to choose and maintain Hoshizaki ice machine parts for reliable performance can be a useful reference for understanding similar components in other machines.
When to escalate: dealing with hard water, scale and cloudy ice
Sometimes the standard 10 to 1 vinegar mix is not enough, especially in homes with hard water that leaves heavy mineral deposits. If you notice white flakes frozen inside ice cubes or see chalky residue on the bin walls, it is time to escalate your approach to how to clean an ice maker with a stronger solution. In those cases, use a 1 to 1 ratio of distilled white vinegar to water, let it soak in the reservoir and water path for a full hour, then run a cleaning cycle and discard every harvest until the smell disappears, always confirming in the manual that this concentration is compatible with your model and that the manufacturer does not require a proprietary descaler instead.
Hard water minerals form stubborn water scale on the evaporator plate, where ice cubes are shaped, and on the internal tubing that carries water to the maker. Over time, this scale insulates the cold metal from the water, so the machine will need more energy to freeze each batch and you will see low ice output even though the compressor runs constantly. A stronger cleaner solution helps remove that scale, but you must always flush with several cycles of fresh water to protect gaskets and to restore the taste of clean ice.
Cloudy or soft ice is also a sign that air is trapped in the cubes or that the water path is partially blocked by scale or mold. If you see this, combine the stronger vinegar routine or a manufacturer‑approved descaler with a careful hand cleaning of the bin, the chute and the scoop storage, then check your home water filter or the dedicated filter for the machine. Many families already use white vinegar to maintain other appliances, and a guide on how to clean your coffee maker with white vinegar for better taste can reinforce the same principles you apply when you clean ice equipment.
Hidden areas people miss when cleaning an ice maker
Most owners focus on the visible bin and forget the small interior parts that quietly affect ice quality. When you plan how to clean an ice maker, add three often overlooked areas to your checklist so the machine will stay hygienic between deep services. These are the water level sensor, the ice chute or door and the scoop storage zone, which all collect splashes, condensation and fine dust from the air.
The sensor usually sits near the top of the bin or inside the freezing compartment, where it tells the maker when to stop the harvest cycle because the bin is full. If this sensor is coated with scale or mold, the machine will misread the level, stop early and create a low ice situation even though your family needs more cubes for drinks and lunch boxes. Wipe the sensor gently with a soft cloth dipped in your diluted cleaner, then rinse with fresh water so you will keep the plastic or stainless steel surface clear and responsive.
The chute and scoop storage are the last places ice touches before it reaches your glass, so they must stay as clean as the bin itself. Remove the scoop, wash it in warm water with mild detergent, then dry it and store it in a dedicated holder rather than burying it in the ice cubes, which will keep ice from picking up kitchen odors and stray food particles. Finally, open the chute or door fully, wipe every surface where ice slides during the harvest, and check that no crumbs or sticky residue remain that could encourage mold growth.
Smart scheduling, filters and new UV C features
Even the best routine for how to clean an ice maker fails if you forget to do it regularly. Instead of guessing, align your cleaning and descaling schedule with two fixed signals, which are the water filter replacement interval and any app based reminders built into modern machines. Many countertop and under counter models now track cycles and will send a notification when it is time to run a cleaning cycle, which helps busy families stay ahead of scale and mold.
For water filters, follow the cartridge schedule printed on the label or in the manual, usually every three to six months depending on water quality and usage. When you change the filter, pair that task with your deeper cleaning routine, including a stronger vinegar solution if you have hard water and a full inspection of the bin, condenser area and air vents. This pairing means the machine will always receive fresh water through a clean filter, which will keep ice tasting neutral and will keep ice cubes from trapping sediment or chlorine odors.
High end ice machines increasingly include UV C modules that shine light on the water path or bin to reduce bacterial growth between manual cleanings. Independent laboratory tests on UV C disinfection in wet environments often report reductions above 99 percent under controlled conditions, but real world performance varies with lamp placement, exposure time and maintenance, and you should always compare those figures with the claims in your specific product documentation and any NSF or UL sanitation listings. These systems do not replace physical cleaning, but they will keep microbial levels lower so your 15 minute routine remains effective and your family enjoys clean ice for longer stretches. When combined with app reminders, a good filter and a simple vinegar based cleaner or branded ice machine sanitizer, UV C features help the machine maintain safe conditions even when life gets busy.
Performance red flags and when to call a professional
Even with a disciplined approach to how to clean an ice maker, some symptoms signal deeper issues that simple home cleaning cannot fix. If you notice a musty or sour smell from the bin after a full cleaning cycle and two flushes with fresh water, there may be hidden mold or biofilm in internal hoses that require partial disassembly. In that case, stop using the ice, turn the machine off, leave it unplugged and schedule a professional service visit to protect your family’s health.
Another warning sign is a sudden drop in production, where the machine will run constantly but still deliver low ice volume compared with its rated kilograms per day. After you have checked for obvious problems such as a blocked air vent, a dirty condenser coil or a warm room temperature, persistent low ice output can indicate a refrigerant issue or a failing pump. These faults sit beyond normal cleaning, and forcing the machine to continue may damage the compressor or cause the harvest cycle to stall mid way.
Finally, pay attention to unusual noises during the harvest or filling stages, such as grinding, squealing or repeated clicking. If cleaning the bin, removing stray cubes and clearing the chute does not resolve the sound, an internal motor or fan may be struggling, which can overheat and spread warm air into the freezing compartment. At that point, a qualified technician can inspect the condenser fan, the circulation pump and the control board, while you return to your regular cleaning schedule once repairs are complete and the maker is back to producing clean ice.
For more detailed guidance on achieving perfectly clear cubes once your machine is healthy, you can consult a dedicated guide on creating perfect frozen ice cubes for refined home drinks, which complements the maintenance advice here. Using that type of resource alongside a consistent cleaning habit will keep ice quality high for everyday family use and for special occasions. Over time, this balanced approach protects both your investment in the machine and the simple pleasure of a cold drink that tastes exactly as it should.
Key figures about cleaning and maintaining an ice maker
- Many manufacturers recommend descaling home ice machines every 2 to 3 weeks in areas with hard water, which aligns with a practical family schedule and prevents heavy water scale from forming on internal parts; always confirm the exact interval in your model specific instructions and any brand service bulletins.
- Deep cleaning of the bin, evaporator area and water path is typically advised every 3 to 6 months, depending on usage intensity and kitchen air quality, to control mold and biofilm growth and to match the guidance in most residential owner’s manuals.
- A 10 to 1 ratio of filtered water to distilled white vinegar is widely used for routine cleaning cycles, offering effective mineral removal while remaining relatively gentle on gaskets and plastic components, though some brands specify proprietary descalers instead, may restrict vinegar use and can deny warranty coverage if unapproved chemicals are used.
- Search interest for how to clean an ice maker reaches tens of thousands of queries per month globally, reflecting how many households struggle with cloudy ice, off flavors and low ice production and look for clear, step by step instructions.
- Newer premium ice makers increasingly integrate UV C modules that can reduce bacterial levels on wet surfaces by more than 99 percent under controlled conditions according to published lab reports on UV disinfection, while real world results depend on lamp output, distance and regular maintenance.
How often should I clean my home ice maker
For most family kitchens, a light cleaning every 2 to 3 weeks and a deeper descale every 3 to 6 months keeps ice quality high. Homes with very hard water or heavy daily use should shorten those intervals slightly. If you ever notice odor, visible scale or cloudy cubes, treat that as a signal to clean immediately rather than waiting for the calendar.
What is the safest cleaner to use inside an ice maker
Food safe options such as a diluted distilled white vinegar solution or manufacturer approved ice machine cleaner are the safest choices. A 10 to 1 mix of filtered water and vinegar works well for routine cycles, while a stronger 1 to 1 mix helps remove stubborn scale, provided your manual does not prohibit acids. Avoid bleach, ammonia or harsh chemicals inside the water path or bin, because residues can affect taste, corrode metal and may void the warranty on some models.
Why is my ice cloudy even after I clean the machine
Cloudy ice often comes from trapped air, mineral rich water or incomplete rinsing after a cleaning cycle. Make sure you flush the machine with at least two full batches of fresh water ice after using any cleaner, discarding those cubes. If cloudiness persists, consider adding a dedicated water filter or using filtered water in the reservoir to reduce dissolved minerals.
Can mold grow in an ice maker that stays cold
Yes, mold and biofilm can still develop in an ice maker because many internal surfaces stay damp rather than frozen solid. The bin, chute, gaskets and water lines all provide moisture and occasional warmth during off cycles. Regular cleaning, good air circulation around the condenser and prompt removal of old ice greatly reduce the risk.
When should I call a technician instead of cleaning it myself
If you notice persistent odors after thorough cleaning, repeated low ice production, leaks, or unusual noises from the compressor or pump, it is time to call a professional. These symptoms suggest mechanical or refrigerant issues that cleaning alone cannot solve. Continuing to run the machine in that state can shorten its lifespan and compromise ice safety.