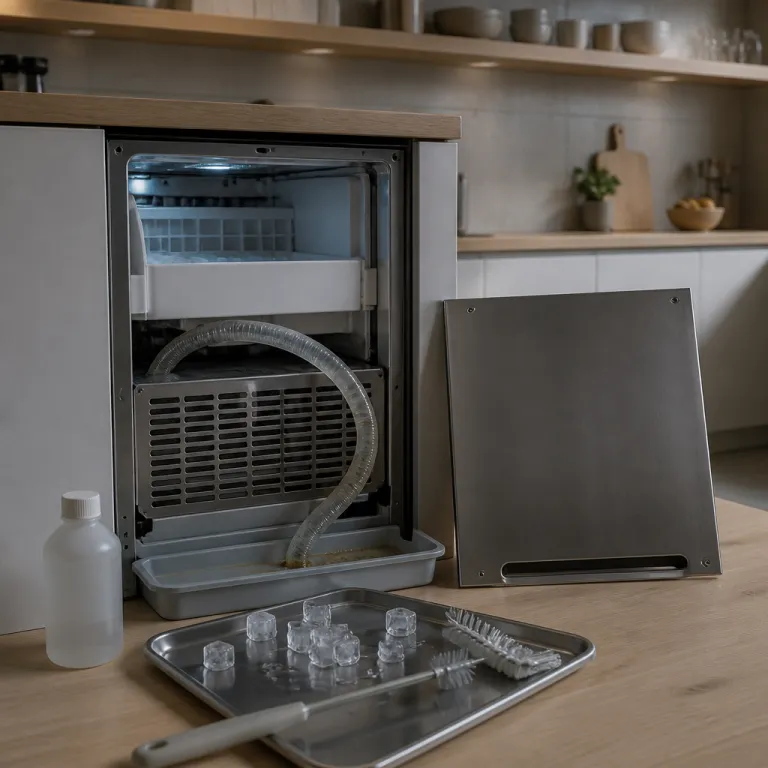
Why ice maker drain line cleaning matters more than wiping the bin
Most owners focus on wiping visible surfaces and forget the hidden drain line. That neglected tube quietly collects warm water, nutrients and bacteria that slowly form a sticky biofilm deep inside. Over time the drain in your ice maker can hold water, trap meltwater and send contamination back toward clean parts that you thought were safe.
During product testing I repeatedly see the same issue in family kitchens where the ice machine runs daily. The bin looks clean, the stainless steel is shiny, yet the drain opening shows pink or orange slime and the plastic ice hose feels slick when you run a brush along it. That slime is biofilm, and without proper ice maker drain line cleaning it will keep growing between every ice cycle and eventually affect taste and safety.
When biofilm narrows the drain line, water will drain slowly or not at all. Melted ice water can back up into the bin, surround fresh ice cubes and create a musty smell that regular surface cleaning cannot remove. If you ignore this drain problem long enough, trapped water can freeze into a solid plug, leaving the line completely frozen and pushing the ice maker toward expensive component failure.
How biofilm forms inside the drain line of home ice makers
Every ice cycle leaves a little waste water that should flow smoothly through the drain. In real kitchens that water often carries tiny food particles, airborne dust and mineral scale from hard tap water that settle as sticky buildup inside the plastic tubing. That thin layer becomes food for bacteria, which multiply quickly in the dark, moist drain line where you rarely clean or even read the maintenance instructions.
As the biofilm thickens, it traps more debris and narrows the path where water will normally escape. The drain in a countertop ice maker or undercounter ice machine then starts to hold water between cycles, which keeps the interior damp and accelerates growth. In my tests with several refrigerator ice maker models, including popular units from GE and Whirlpool, the machines with the dirtiest drain opening always showed the strongest off odors in the bin, even when the visible interior looked freshly wiped with a cleaner.
Self cleaning cycles help rinse the water path that freezes ice, but they rarely touch the separate drain line that carries meltwater away. That means even premium machines marketed as self cleaning ice makers still need manual drain attention, especially in homes with hard water where mineral scale builds faster. If you are choosing between models for a hard water kitchen, it is worth reading a detailed guide on the best ice maker for hard water and what self cleaning really delivers.
Warning signs your ice maker drain line is already in trouble
Slow drainage is usually the first visible clue that your drain line needs cleaning. You may notice standing clean water or slightly cloudy ice water pooling at the bottom of the bin after a full cycle. When I test machines in family homes, I often see a thin ring of residue where that water will sit and then evaporate, leaving behind mineral scale and organic content that feed more buildup.
Another clear warning sign is discoloration or slime at the drain opening under the ice maker bin. Pink, orange or brown streaks on plastic parts around the drain usually indicate biofilm rather than simple dirt that a quick brush can remove. If you have already wiped the bin and other clean parts with a food safe cleaner yet a musty smell returns within a day, the problem almost always lives deeper inside the drain line.
Noise and performance changes can also point to a drain issue before you face a frozen blockage. Some ice machine models start cycling more often because sensors misread water levels when the drain can hold water instead of clearing it. If you ignore these symptoms, trapped water may freeze in the line, and repeated thawing can stress fittings enough to cause leaks or even long term component failure.
Many owners search for taste problems in the water filter and forget the drain path that sits just beyond the bin. If you care about both flavor and hygiene, pair regular filter changes with targeted ice maker drain line cleaning and smart water preparation. For example, using properly treated water for ice can improve clarity and reduce residue, as explained in this guide on how to get clearer nugget ice by adjusting your water prep.
Why self cleaning cycles and surface wipes are not enough
Most modern ice makers include a self cleaning cycle that circulates clean water or a diluted cleaner through the freezing chamber. That feature helps reduce mineral scale on the evaporator and keeps the visible reservoir fresher between deep cleanings. However, during testing I consistently find that these cycles do not flush the separate drain line where meltwater and debris quietly collect.
The design of many countertop and refrigerator ice maker systems routes the drain away from the main water path. As a result, the self cleaning program focuses on the parts that touch fresh water and ice, while the drain line only sees whatever drips through by gravity. That trickle is not enough to scour away sticky buildup, so biofilm remains attached deep inside the tubing and continues to grow after every ice cycle.
Surface wiping has similar limits, even when you use an effective food safe cleaner and a dedicated brush for the bin. You can clean parts you can see and reach, but you cannot rely on a quick spray to sanitize a narrow drain that runs behind panels or under the cabinet. The situation is similar to coffee equipment, where wiping the carafe is not enough and you need a periodic internal flush, as explained in guides on how to clean a coffee maker with white vinegar for better taste.
For families who run their ice machine daily, especially in a warm kitchen, the gap between what self cleaning covers and what the drain actually needs becomes critical. Without a manual protocol for ice maker drain line cleaning, even premium models that promise low maintenance can develop odors and taste issues within a few months. Treat the built in cycle as a helpful assistant, not a complete replacement for hands on drain care.
Step by step drain line cleaning protocol for home ice makers
Start by unplugging the ice maker or switching off the refrigerator ice system to work safely. Remove the bin and any trays so you can see the drain opening and reach the area where water will exit the compartment. If your model includes a removable plastic ice hose, detach it carefully and place it in a sink where you can clean parts thoroughly without splashing the rest of the kitchen.
Prepare a cleaning solution using warm clean water mixed with a food safe sanitizer or a manufacturer approved cleaner. As a general reference, many appliance brands recommend about one tablespoon of unscented sanitizer or ice machine cleaner per quart of water, but always confirm the exact dilution in your user manual. Fill a small container that you can hold comfortably, then feed a flexible drain brush or pipe cleaner through the line from the bin side toward the outlet; on most residential ice makers a brush in the 1/4 to 3/8 inch diameter range will fit typical plastic tubing.
Once you have scrubbed the drain line, flush it with several rounds of clean water to rinse away loosened buildup. Let gravity do the work by holding the ice maker or ice machine drain hose over a sink or bucket while you pour water slowly into the drain opening. Keep flushing until the water runs clear and no slimy residue appears on the brush or in the rinse water, and avoid using abrasive drain chemicals or thick gels that are not specifically labeled as safe for ice machines.
Before reassembling, inspect all visible plastic components, gaskets and the underside of the bin for hidden residue. Wipe these clean parts with your sanitizer solution, then rinse with clean water and dry thoroughly so no pockets of moisture remain to restart biofilm growth. When everything is dry, reconnect the ice hose, reinstall the bin, restore power and run one or two ice cycles, discarding the first batch of ice to ensure no cleaner remains in the system.
How often to clean, and when to call a professional
For a typical family that uses ice daily, plan a full ice maker drain line cleaning every three to six months. In hotter climates or busy households where the ice machine runs almost nonstop, monthly drain maintenance keeps water moving freely and prevents the line from becoming a hidden reservoir that can hold water and bacteria. If your home has very hard tap water, you may need even more frequent attention because mineral scale accelerates buildup inside the drain.
Countertop ice makers and many refrigerator ice systems are designed so owners can access the drain opening and attached plastic hose with a simple brush. When I test these models, I look for clear access panels and hoses that detach without tools, because that makes it realistic for a busy parent to clean parts on a Saturday morning. If your unit matches this design, you can confidently follow the step by step protocol and keep both the visible bin and the deep inside drain line under control.
Undercounter ice machines with long built in drain runs are different, and they sometimes route the drain through cabinetry or into a nearby floor drain. If you cannot easily reach the full length of the line, or if you suspect a frozen blockage inside the wall, a professional technician should check the drain and verify that no component failure has occurred. In those cases, forcing a brush or pouring aggressive cleaner into the system can cause leaks that damage cabinets and may even raise questions with your appliance warranty or the installer’s documentation.
Buying an ice maker with drain hygiene in mind
When you shop for a new ice maker, do not focus only on cube style, production rate and how the stainless steel looks in your kitchen. Pay close attention to how the drain line is routed, whether the drain opening is visible and whether the ice hose can be removed for cleaning without tools. A design that lets you easily check drain cleanliness will save you time, protect your family and reduce the risk of unpleasant surprises later.
Look for models where the manufacturer clearly explains the cleaning cycle and includes instructions for manual drain maintenance in the user guide. During my tests I give higher marks to ice machine designs that ship with a dedicated brush or at least specify the correct brush size for the drain, because that shows the maker expects owners to maintain the system properly. Clear guidance on how to flush with clean water, how to sanitize plastic parts and how often to repeat the process is a strong signal of a brand that takes hygiene seriously.
Also consider how the ice maker integrates with your refrigerator or cabinetry, because cramped installations can hide the drain line and make future access difficult. If you are planning a built in undercounter unit, discuss drain routing with your installer so you can still reach key sections for periodic ice maker drain line cleaning. A little planning at purchase time will keep both water and ice flowing cleanly for years, instead of leaving you with a beautiful appliance that quietly develops a dirty, inaccessible drain.
Key statistics on ice maker hygiene and drain line risks
- Studies on food service ice machines have found that more than 50 % of units sampled showed measurable biofilm or microbial contamination in drain components, highlighting how easily neglected drains can compromise otherwise clean systems (for example, see summaries in public health inspection reports from city and county health departments in the United States and peer reviewed surveys such as M. A. M. W. Hageskal et al., International Journal of Food Microbiology, 2009).
- Hard water areas in the United States can reach mineral contents above 180 milligrams per liter of calcium carbonate, which significantly accelerates mineral scale buildup in both water lines and drains compared with soft water regions (figures reported by the U.S. Geological Survey in its National Water Quality Assessment Program and related hardness maps).
- Public health investigations have documented that ice from contaminated machines has been implicated in outbreaks of gastrointestinal illness, underscoring that ice is considered a food and must be handled with the same hygiene standards as drinking water (case reviews published by the Centers for Disease Control and Prevention in its Foodborne Disease Outbreak Surveillance System and Morbidity and Mortality Weekly Report).
- Manufacturer maintenance schedules for residential ice makers commonly recommend internal cleaning every three to six months, but field surveys by major appliance service networks show many homeowners stretch this to once a year or longer, increasing the likelihood of drain blockages and off flavors in ice (for instance, service data summarized by large U.S. repair chains and guidance in owner manuals from brands such as GE, Whirlpool and KitchenAid).
FAQ: ice maker drain line cleaning
How often should I clean the drain line in my home ice maker ?
For most households, plan to clean the drain line every three to six months. If your ice machine runs daily in a warm kitchen or you have hard tap water, monthly cleaning is safer. Any time you notice slow drainage, standing water or odors, treat that as a signal to clean immediately rather than waiting for the calendar.
Can I use vinegar or bleach to clean my ice maker drain line ?
A mild food safe sanitizer or a manufacturer approved cleaner is usually the best choice. Some brands allow diluted white vinegar, while others warn that strong acids or bleach can damage plastic parts, gaskets or the ice hose. Always follow your user manual and rinse thoroughly with clean water so no chemical taste reaches your ice.
What tools do I need for effective drain line cleaning at home ?
The most useful tool is a flexible drain brush or long pipe cleaner sized to fit your specific drain opening. Pair that with a small container for warm sanitizer solution, a soft cloth for visible surfaces and a towel to catch spills. With these simple tools you can scrub deep inside the drain line, flush away loosened buildup and then reassemble the ice maker confidently.
How do I know if the drain problem is serious enough for a technician ?
If you have cleaned the accessible drain line thoroughly and water still will not flow, or if you suspect a frozen blockage behind panels or inside a wall, it is time to call a professional. Sudden leaks around the base of an undercounter ice machine or refrigerator can also indicate hidden component failure in the drain path. In those situations, forcing more water or cleaner into the system can worsen damage, so expert inspection is the safer option.
Does a self cleaning ice maker mean I can skip drain maintenance ?
Self cleaning features help keep the water path and freezing components cleaner, but they rarely flush the entire drain line. You still need periodic manual ice maker drain line cleaning to remove biofilm and mineral scale from the tubing that carries meltwater away. Treat the automatic cycle as a supplement, not a substitute, for hands on drain care.